Struggling with messy shipments? Learn how to create stunning, scannable product and shipping labels using drag-and-drop software. Discover tips for barcodes, QR codes, and thermal printing on Windows and macOS.
In the fast-paced world of e-commerce and retail, first impressions are everything. Your product label is often the first physical touchpoint a customer has with your brand. Yet, many small to medium-sized businesses (SMBs) struggle with "printing chaos"—blurry barcodes, misaligned designs, and the high cost of hiring professional designers for every small update.
Enter Labelr: the "office-first," cross-platform label design solution designed to give you professional results without the professional price tag. Whether you are on Windows or macOS, Labelr empowers you to create industry-standard labels that look great and scan perfectly every time.
In this guide, we’ll walk you through the simple steps to design and print your own professional labels using Labelr.
Why Labelr is the Ultimate Choice for SMBs
Before we dive into the "how-to," let’s look at why Labelr stands out for business owners:
- Cross-Platform Flexibility: Most industrial label software is stuck in the Windows XP era. Labelr runs beautifully on both Windows and macOS, keeping your workflow consistent.
- Visual Drag-and-Drop Editor: If you can use Canva or PowerPoint, you can use Labelr. No coding or complex coordinates are required.
- Industrial Printing Support: Labelr natively supports high-speed thermal printing protocols like ZPL (Zebra) and TSPL (TSC/Godo), ensuring your printer runs at its maximum efficiency.
- Privacy First (Offline-First): Your customer data and design assets stay on your machine. Labelr works offline, ensuring your business intelligence never leaves your control.
Step-by-Step: Designing Your First Professional Label
Step 1: Set Up Your Canvas
Every great design starts with the right foundation. When you open Labelr, the first thing you'll do is set your label dimensions.
- Use the Label Setup Toolbar at the bottom of the canvas to define your width and height (typically in mm or inches).
- Choose your preferred unit—Labelr handles the conversion for you automatically.
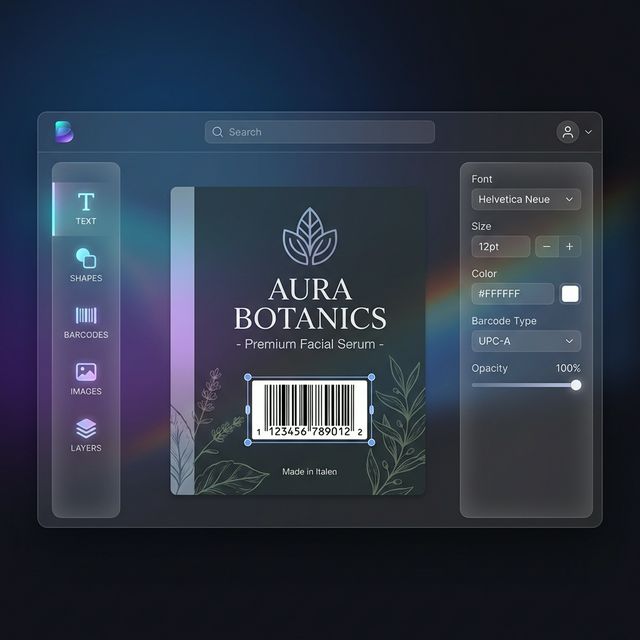
Step 2: Add Core Elements via the Sidebar
The Left Sidebar is your creative toolkit. It’s organized into logical sections for a frictionless experience:
- Text: Add product names, ingredients, or "Thank You" notes. You can even use Path Text to wrap text around curves!
- Data (Barcodes & QR Codes): Essential for shipping and inventory. Labelr supports standard barcode formats and dynamic QR codes for links to your website or tracking pages.
- Media: Upload your brand logo or product icons. The built-in Image Processor helps you optimize graphics for thermal printing (which usually requires high-contrast black and white).
- Shapes & Tables: Use the Shapes Selector for borders and dividers, or the Table Tool for organized nutrition facts or price lists.
Step 3: Precision Editing with the Properties Panel
Once an element is on the canvas, select it to unlock the Properties Panel on the right. Here, you can fine-tune:
- Position & Size: Get pixel-perfect alignment.
- Typography: Choose from curated fonts like Manrope or Product Sans to give your brand a modern look.
- Layering: Use the Layers Panel to move elements forward or backward, ensuring your logo never covers up your barcode.
Step 4: Mastering the Print
This is where the magic happens. Thermal printers are fast, but they can be finicky. Labelr’s Print Dialog simplifies the process:
- Select Your Printer: Labelr automatically detects your connected thermal printers.
- Choose Your Protocol: For Zebra printers, select ZPL Protocol. For most other brands, TSPL is the way to go. If you are using a standard inkjet or laser printer, use Windows/macOS Printing.
- Adjust DPI: Match the settings to your printer (usually 203, 300, or 600 DPI) for the sharpest results.
- Fine-Tune Margins: Use the Offset settings to nudge your design if the printer's physical alignment is slightly off.
- Preview: Always check the Real-time Preview window to see exactly how the label will look before hitting "Print."
Pro Tips for Scannable Labels
- Contrast is King: Thermal printers don't do "gray" well. Use solid black and white for barcodes.
- Quiet Zones: Leave some white space around your barcodes to ensure scanners can read them easily.
- Size Matters: Ensure your text is at least 6pt for readability on standard 4x6 shipping labels.
Conclusion: Take Control of Your Shipments
You don't need a degree in graphic design or an IT specialist to create professional labels. With Labelr's visual editor and robust thermal printing support, you can turn a "printing headache" into a streamlined part of your business.
Ready to upgrade your labels? Download Labelr today and experience the power of professional DIY design.